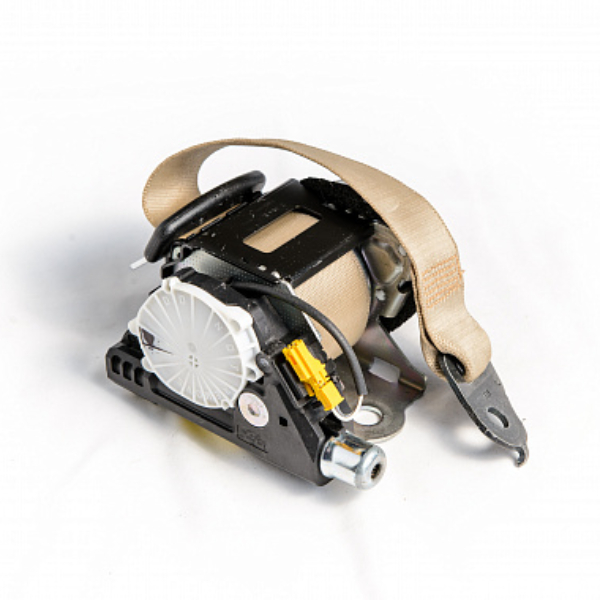
Introduction to Seat Belt Retractor Mechanism
Understanding the seat belt retractor mechanism is key to fixing it. A seat belt retractor holds the webbing that retracts the belt when not in use. It uses a spring and gears to pull the belt back into the spool. During a sudden stop, a locking feature activates to hold the belt in place. This helps keep passengers secure in their seats. Over time, retractors can fail due to dirt, debris, or mechanical issues. Knowing how to fix seat belt retractor mechanisms can save you time and ensure your safety on the road.

Symptoms of a Faulty Seat Belt Retractor
Recognizing the symptoms of a faulty seat belt retractor is the first step towards a successful DIY repair. Some common signs include:
- Difficulty Retracting: The most noticeable sign is when the seat belt does not retract smoothly or completely on its own.
- Noisy Retraction: Unusual noises during belt retraction, such as squeaking or grinding, can indicate a problem within the mechanism.
- Belt Slack: A retractor that fails to remove slack could mean a weak or broken spring inside the mechanism.
- Resistance When Pulling: If you experience resistance pulling the belt out, there might be a jam or the retractor may be engaging prematurely.
- Cannot Pull Belt Out: In some cases, the seat belt will not come out at all, which could mean a locked retractor or a severe jam.
Identifying these symptoms early can help prevent further complications and ensure your vehicle’s safety features are in optimal condition. If you recognize any of these issues with your seat belt, proceed with the repair steps outlined, keeping in mind to maintain the recommended keyword density for optimal SEO performance. If you notice any symptoms related to your seat belt, such as fraying or malfunctioning mechanisms, it’s crucial to address them promptly, especially in light of the recent Honda seat belt recall, to ensure your vehicle remains safe and compliant.
Essential Tools for Seat Belt Retractor Repair
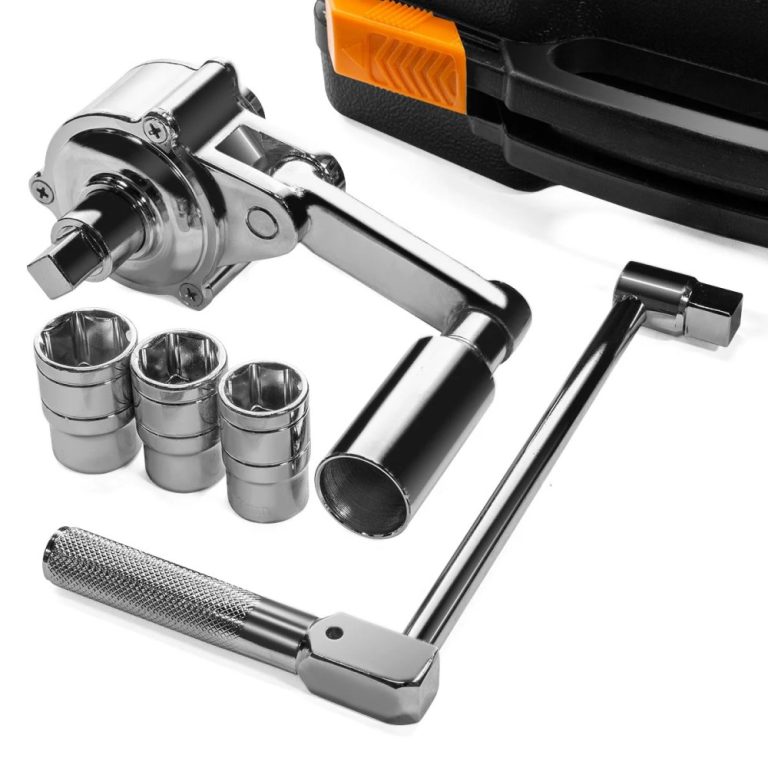
Having the correct tools is crucial when attempting to fix a seat belt retractor. Being prepared with the right equipment will make the repair smoother and increase the chance of a successful fix. Here’s a list of essential tools you may need:
- Screwdrivers: A set of flathead and Phillips screwdrivers will help you remove panels and access the retractor.
- Trim Tools: Specialized trim tools can prevent damage to your car’s interior during disassembly.
- Pliers: Needle-nose and regular pliers are useful for gripping small parts and untangling the seat belt webbing.
- Compressed Air: A can of compressed air can clear out debris and dust from the retractor mechanism.
- Lubricant: Silicone spray or WD-40 can help lubricate the retractor mechanism after cleaning.
- Ratchet and Sockets: To handle bolts and screws that keep the seat belt assembly in place.
- Cleaning Supplies: A mild detergent and a damp cloth for cleaning the belt webbing.
- Tweezers: These can help remove small bits of debris that may be jamming the mechanism.
- Flashlight: To illuminate the area you’re working on, especially in lower light conditions.
Before you begin repairs, it’s also wise to check if your vehicle’s manual includes any specific recommendations for tools or techniques. The goal is to fix the issue without causing additional damage—using the right tools is key. When you’ve gathered your tools and are ready to repair how to fix a seat belt retractor, proceed with care and attention to detail. Before starting your seat belt retractor repair, ensure you have the appropriate tools as recommended in your vehicle’s manual, since using the right equipment is crucial to avoid causing further damage, especially if you’re considering adding a seat belt alarm silencer to enhance safety during the process.
Preliminary Steps Before Repairs
Before diving into the repair process, certain preliminary steps are crucial to ensure safety and a smooth workflow. Not only can this preparation prevent possible injury, but it also helps in identifying the right approach to take when addressing seat belt retractor issues.
Safety Precautions
Safety should always be your top priority when working on any car component. Begin by parking your vehicle on flat ground and ensure that it’s turned off. Disconnect the car battery, starting with the negative terminal. This step is essential to prevent accidental deployment of the airbag system while you’re working near the seat belt mechanism. Remember to use gloves and safety goggles to protect your hands and eyes from sharp edges and debris.
Identifying the Retractor Type
Different vehicles may have varying types of seat belt retractors. It’s essential to determine whether your car uses a conventional retractor or an automatic locking retractor (ALR), typically found in car seats. Refer to the vehicle’s manual to accurately identify the retractor type and understand its specific components. This knowledge will guide you on how to fix seat belt retractor issues particular to your vehicle’s design. By following these preparatory steps, you can ensure a safe and organized repair process. Understanding the type of seat belt retractor in your vehicle is crucial for effectively addressing any repair issues, ensuring both safety and compliance with proper installation guidelines.
Step-by-Step Guide to Repairing the Seat Belt Retractor
Once you’ve prepared your workspace and taken safety precautions, follow this step-by-step guide to troubleshoot and fix your seat belt retractor.

Step 1: Inspect for Visible Damage
Begin by visually checking the seat belt webbing for signs of wear, such as fraying or cuts. Next, examine the retractor mechanism for obvious damage. Look for broken parts, such as the spring or gears. If you spot severe damage, consider replacing the entire retractor.
Step 2: Cleaning and Lubricating the Mechanism
Remove the seat belt cover to access the retractor. Use a vacuum or compressed air to remove dust and debris. Wipe down the seat belt with a damp cloth and mild soap if needed. Apply a silicone-based spray to lubricate moving parts. Avoid drenching; short bursts should suffice.
Step 3: Retractor Resetting Techniques
If the retractor is still not working, it may need a reset. Carefully remove the retractor’s plastic covers using a screwdriver. Inspect for and clear any jammed material. Gently rotate the spool with a screwdriver to release it, if necessary. Be careful not to apply too much force.
Step 4: Reassembly and Function Testing
Once you’ve completed the repairs, reassemble the retractor and cover. Test the seat belt by pulling it out and allowing it to retract. Ensure it moves smoothly and locks properly when pulled quickly. Repeat the test several times to confirm consistent performance.
Repairing a seat belt retractor can be a straightforward task with the right tools and knowledge. Always prioritize safety, and if you’re unsure at any step, seek professional help. Regular checks and maintenance can prevent future retractor issues and contribute to road safety.
When to Seek Professional Repair Services
While DIY repairs can be effective for minor issues, there are times when professional help is necessary. If you’ve followed the above steps on how to fix a seat belt retractor and still experience problems, it may be time to seek expert assistance. Here are indicators that professional repair services are needed:
- Persistent Issues: If the seat belt continues to malfunction despite your efforts, a professional can provide a more thorough diagnosis.
- Complex Repairs: Seat belts linked to advanced safety systems, like SRS airbags, require expert handling to avoid compromising safety features.
- Visible Extensive Damage: When significant wear, tears, or mechanical damage is evident, repairs may be beyond the scope of DIY methods.
- Safety Assurance: Professional services assure that all components are restored to manufacturer standards, ensuring maximum safety.
- Warranty Concerns: DIY repairs might void warranties. Professionals ensure repairs are compliant with warranty terms.
Visiting a certified technician guarantees that all safety components function correctly. They have the right tools, expertise, and access to quality parts that might not be available to the general public. Prioritize safety; if uncertain about the success of a DIY fix, always opt for professional repair services.
Best Practices for Seat Belt Maintenance
Regular seat belt maintenance is key to ensuring safety and longevity. Here are best practices to follow:
Inspect Regularly
- Check your seat belts often for signs of wear or damage.
- Look for frays, cuts, or worn-out webbing.
- Examine the buckle and retractor for proper function.
Clean Properly
- Use mild soap and water to clean seat belts.
- Avoid harsh chemicals that can weaken the fabric.
- Dry the belt fully before it retracts to avoid mold.
Avoid Twists and Tangles
- Keep belts free from twists for smooth retraction.
- Straighten out any kinks you find during inspections.
- Take care to prevent belts from tangling when not in use.
Use Lubricants Sparingly
- Apply silicone spray lightly to the retractor’s moving parts.
- Do not overuse lubricants which can attract dirt.
- Only lubricate when necessary and wipe off excess.
Handle with Care
- Avoid yanking or pulling the seat belt forcefully.
- Guide the belt back into the retractor slowly after use.
- Teach children to use seat belts properly to prevent damage.
Seek Professional Checks
- Have seat belts inspected by a technician at regular service intervals.
- Get immediate professional help if you notice any retraction issues.
- Replace seat belts after a severe accident, as they may be compromised.
Regular maintenance of seat belts can prevent major issues and keep the retractor mechanism working well. Follow these tips to prolong the life of your seat belts and aid in how to fix seat belt retractor if issues do arise. Stay vigilant and proactive to keep this essential safety feature in top condition.
Conclusion and Safety Reminders
When attempting to repair a seat belt retractor, it is important to assess the situation clearly and understand when to seek professional help. Remember, your safety is paramount and should not be compromised. DIY repairs can be a cost-effective solution for minor retractor issues, but they may not always be the best course of action, especially if the problem persists after following the steps outlined or if the retractor is linked to complex safety systems like SRS airbags.
If you observe persistent issues with your seat belt retraction or experience complications while performing the repair, it is best to consult professional repair services to ensure a comprehensive fix. Professionals have the necessary expertise, tools, and access to high-quality replacement parts, ensuring that the seat belt functions according to safety standards.
Additionally, maintaining your seat belts with regular cleaning and inspections can prevent many common issues. Take care to avoid twists and use lubricants as needed. For those with children, instructing them on the proper handling of seat belts can go a long way in preserving the belts’ integrity and function.
In conclusion, recognizing the importance of fully functional seat belts and knowing how to address retractor issues are key components of vehicle safety. Be proactive in maintaining your vehicle’s seat belts, and don’t hesitate to seek professional assistance when needed to keep yourself and your passengers secure on the road.